This year I decided, for fun, that I'd only decorate my tree with ornaments that I've made. :D Ok, so it's not as sparkly as it always used to be, but at least I can look at it and say I made it all, which is much more fun, eh? :)
Here's my tree....somehow December sneaked up on me this year, so I haven't fnished making all the ornaments yet (I'm still busy making some), so I'll post my updated tree as soon as I've finished my other ornaments. :)
The big star hanging above the tree I got from
Birgit's Daily Bytes, and it's so easy to make. I had a hook in the ceiling so I just hung it up from there and placed the tree underneath, hehe.
I also suddenly realized that I didn't have a topper for my tree, and it looked quite odd without one, so I made a little angel to put on top. Not my best work, but desperate times call for desperate measures:
I used a small styrofoam ball to make the head, and glued one different lengths of gold "string" to make the hair. I folded a piece of ordinary white paper into a cone for the body / dress. I stuck a toothpick in the head and inserted it into the top of the cone, then cellotaped and glued the toothpick to the inside of the cone to secure the lot. I drew on some designs with a glue pen and sprinkled on gold glitter, then finally wrapped some gold ribbon around neck. Well, it'll do for this Xmas. :) This was far to finicky to make, so I won't be doing that again!
And then here are some of the ornaments I made last year and thought out this year:
My glittered wooden star ornaments. I made them
HERE.
I made these ornaments from old Xmas and b'day cards...I made them
HERE.
These beaded loops with the bells I made
HERE.
I collected a whole bagfull of pinecones at our family farm last year Oct. I spray painted some of them gold last year for decorating the table for Xmas lunch, but this year I just placed them in the tree to add some more colour.
I made some beautiful snowflakes too, and you can find the link to the pattern in my post
HERE.
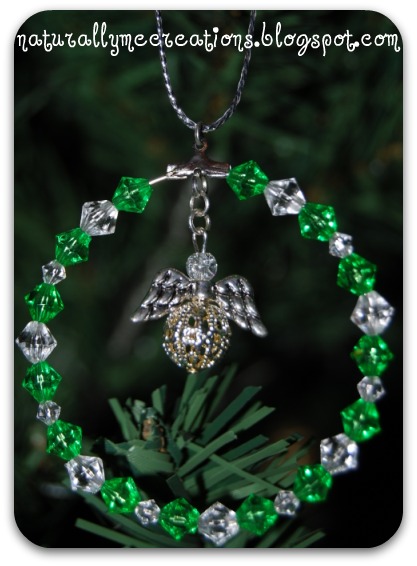
I made some more beaded loops for the tree, but replaced the bells with angels this time. I made the little angels as well by using little wings, a lovely filigree bead as the body and a cracked glass bead for the head. Easy peasy. :) I also used earring hoops this time instead of memory wire as with my other beaded loops above - I find using these earring hoops MUCH easier that the memory wire - it costs a bit more, but oh well, it's worth it. :)
And I made these recycled little prezzies for the tree
HERE.
And finally I made these crystal danglies. I haven't made a post about them previously. I just used tigertail wire and threaded on a filigree bead and clear acrylic beads, and secured them with crimp beads. I made a loop at the end of the danly with the tigertail and attached another dangly to the bottom - for the dangly I added 2 sizes of acrylic bicones onto a head pin. Lastly I used some irridescent "string" to make a little bow with.
And that's my tree so far! Now I have some more Xmas gifts to wrap and then I need to get on with the rest of my ornaments! :D
All these ornaments were made with my Totally Handmade Xmas Tree Decorations Pledge - if you wanna join in this year or next year, grab my badge
here (just scroll to the bottom) and remember to let me know if you made any of your own Xmas tree decorations! :)
 Linked up at these LINKY PARTIES:
Cup of Delight Sew Stylish Boutique
Linked up at these LINKY PARTIES:
Cup of Delight Sew Stylish Boutique